前言
虽然说不要重复造轮子,但是知道轮子是怎么造出来的还是非常有必要的。本人也比较喜欢折腾,闲暇之余就写了个cq-vui的组件库。当然,我是个弱鸡,大佬们感觉有哪里需要改进优化的,还请留言告知。万分感谢!
这篇文章记录我在开发UI组件库的过程,也希望能够帮助看着这篇文章的你。
1、创建项目
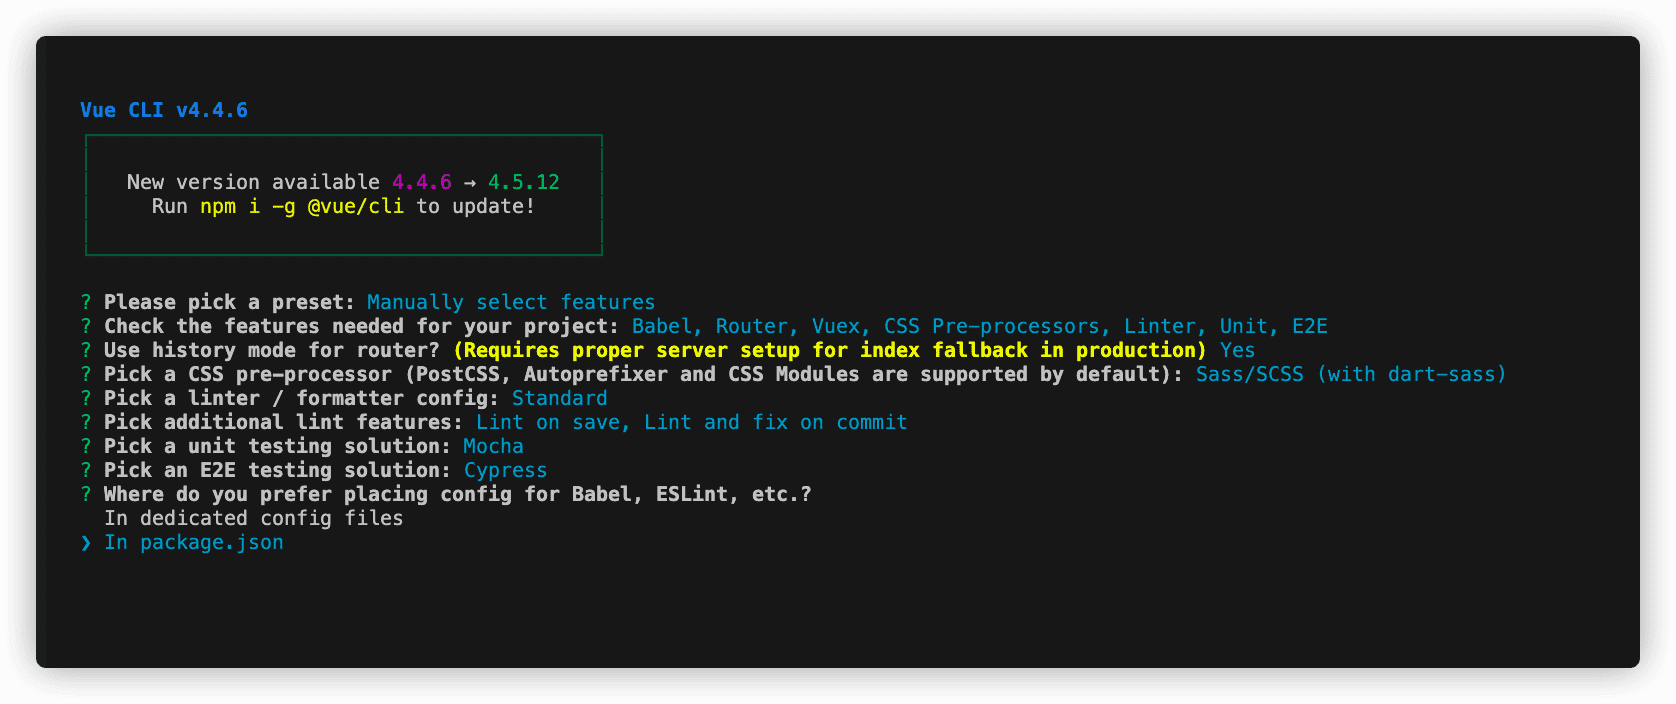
创建项目这点想必大家都会,如果不会的话,那就官网学习下喽!使用下面命令创建项目,然后根据需求进行选择,下图是本人进行选择的一些参数,仅供参考!
2、初始化项目
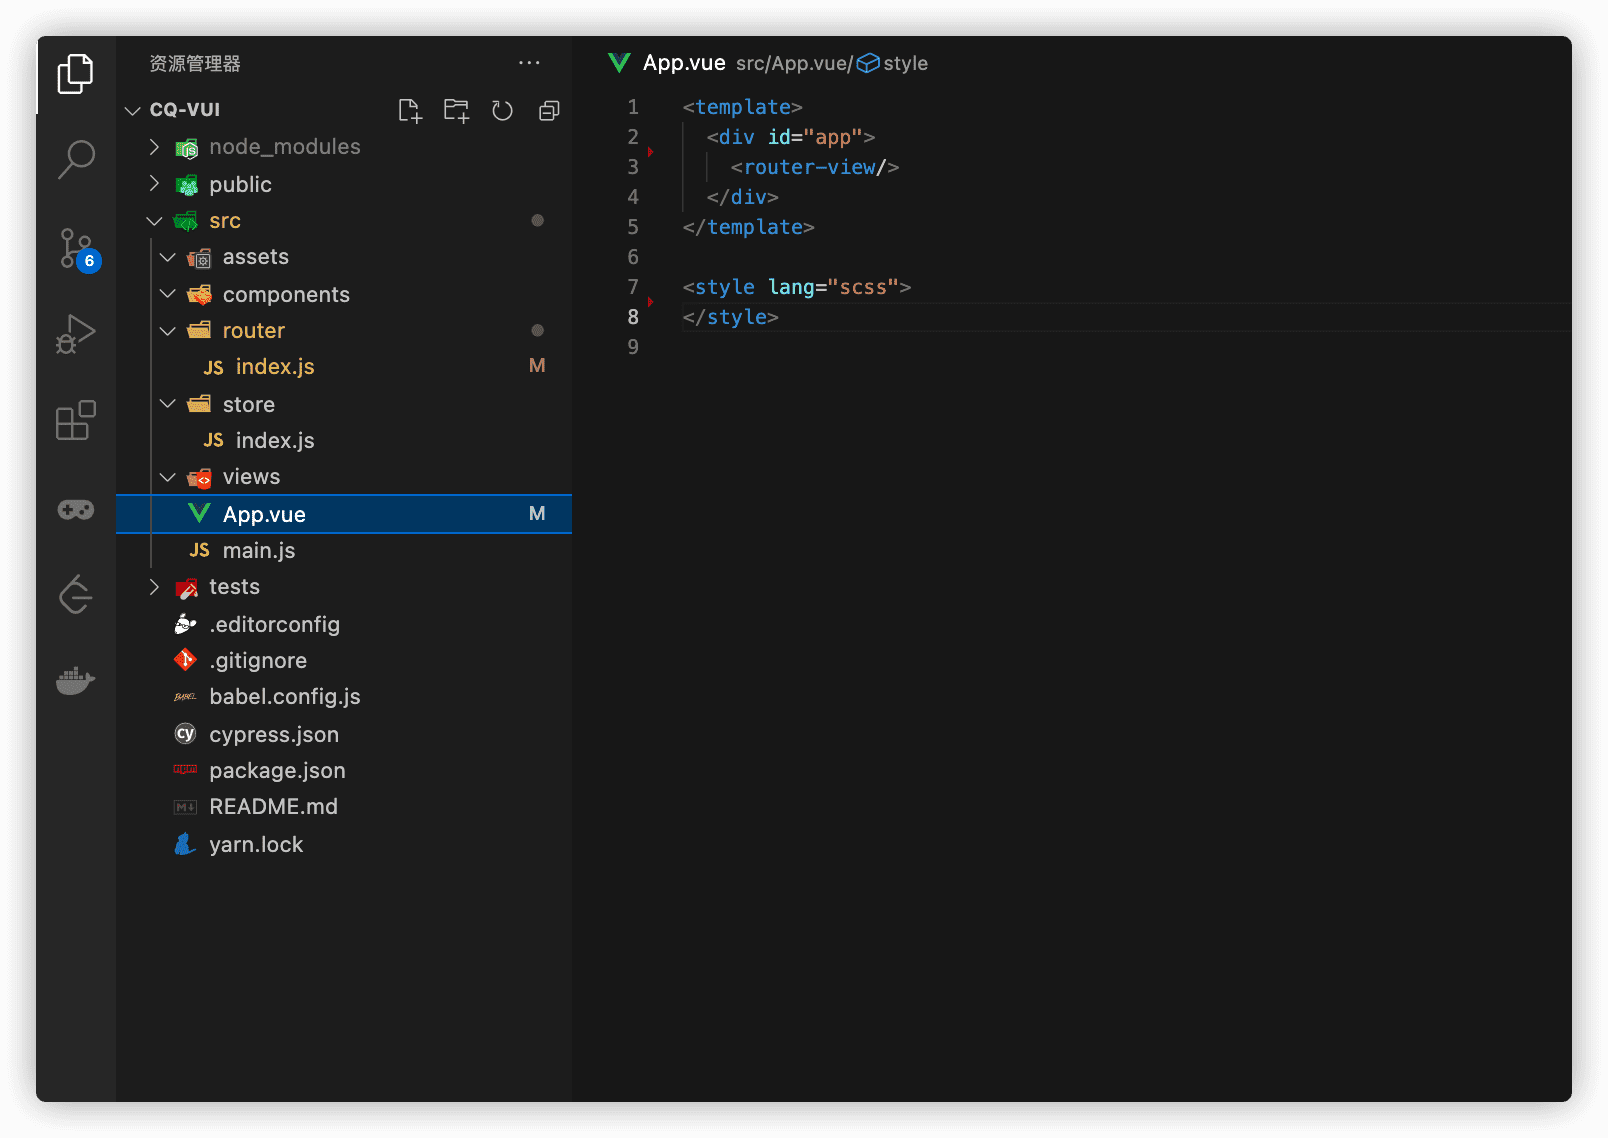
项目创建完成后是一个默认的项目,里面有一些文件我们是不许要的,在开始工作之前先将无用的文件进行删除,重置项目。
处理后的项目目录
启动项目
打开页面可以发现是一个空的页面
创建组件
components下创建一个button.vue文件
1
2
3
4
5
6
7
8
9
10
11
12
13
14
15
16
17
18
19
| <template>
<button class="cq-button">我是按钮</button>
</template>
<script>
export default {
name:'CqButton'
}
</script>
<style>
.cq-button{
border: none;
outline: none;
background-color: coral;
color: aliceblue;
height: 30px;
width: auto;
padding: 0 10px;
}
</style>
|
components下创建一个index.js文件,用于注册组件
1
2
3
4
5
6
7
8
9
10
11
12
13
| import button from "@/components/button.vue";
const components = {
button
};
const install = function(Vue) {
Object.keys(components).forEach(key => {
Vue.component(components[key].name, components[key]);
});
};
export default install;
|
在main.js下引入导出的组件
1
2
3
4
5
6
7
8
9
10
11
12
13
14
15
| import Vue from 'vue'
import App from './App.vue'
import router from './router'
import store from './store'
+ import CqUi from './components/index'
+ Vue.use(CqUi)
Vue.config.productionTip = false
new Vue({
router,
store,
render: h => h(App)
}).$mount('#app')
|
在view文件夹下创建一个index.vue页面
1
2
3
4
5
6
7
8
9
10
11
12
13
| <template>
<cq-button />
</template>
<script>
export default {
name:'indexPage'
}
</script>
<style>
</style>
|
在router下的index.js中设置路由
1
2
3
4
5
6
7
8
9
10
11
12
13
14
15
16
17
18
19
20
21
| import Vue from "vue";
import VueRouter from "vue-router";
import Index from "../views/index.vue";
Vue.use(VueRouter);
const routes = [
{
path: "/",
name: "Index",
component: Index
}
];
const router = new VueRouter({
mode: "history",
base: process.env.BASE_URL,
routes
});
export default router;
|
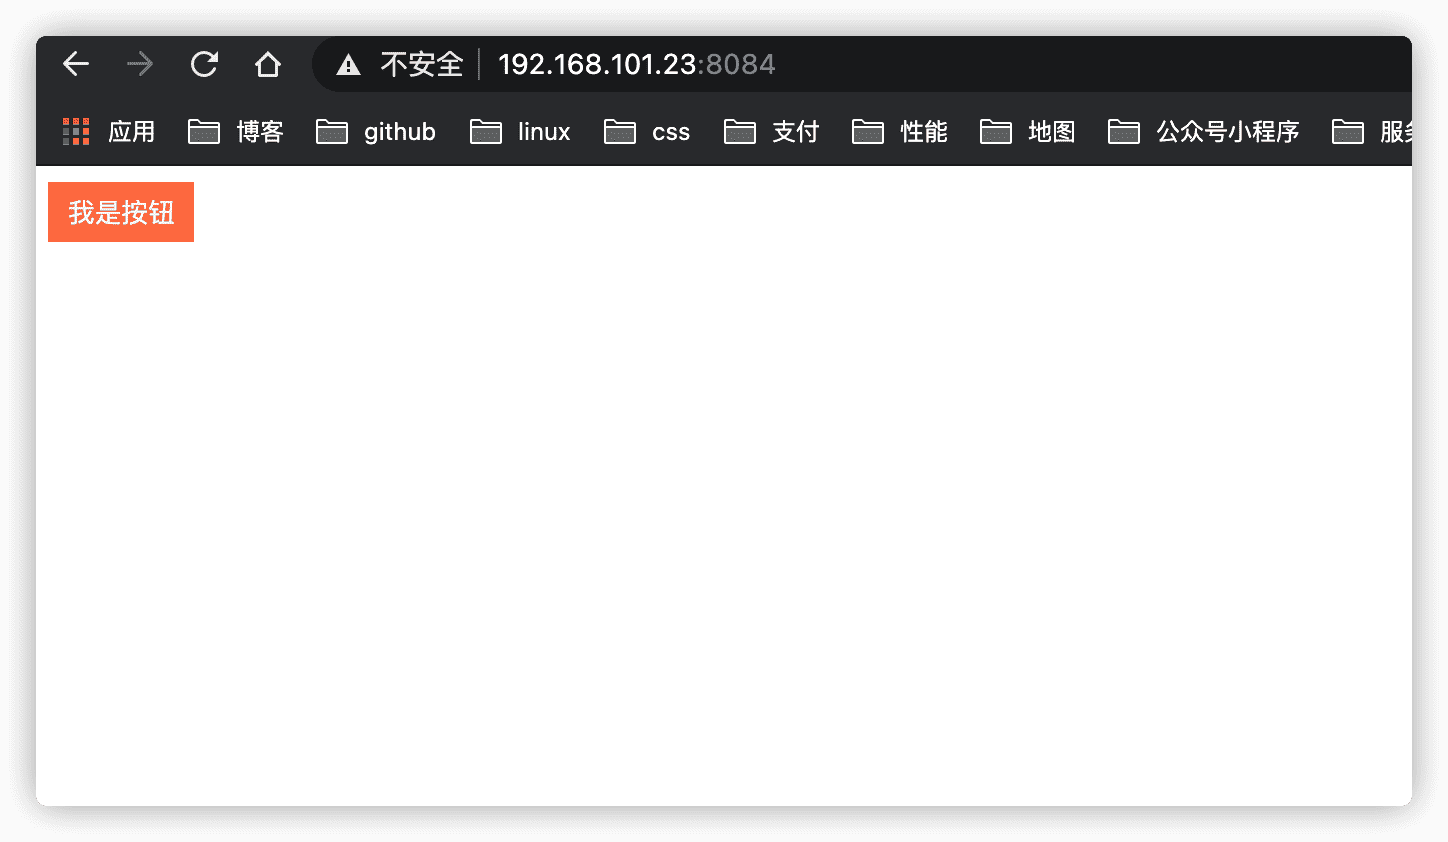
此时打开页面就可以看到我们的按钮了
调整项目
要做成一个库进行发布,我们仅仅这样是不行的!还需要对项目进行调整(参考的是ElementUI组件库进行配置的)
将src文件夹改为examples
创建一个 packages文件夹,将资源文件复制一份到此文件夹中
配置package.json文件
1
2
3
4
5
6
7
8
9
10
11
12
13
14
15
16
17
18
19
20
21
22
23
24
25
26
27
28
29
30
31
32
33
34
35
36
37
38
39
40
41
42
43
44
45
46
47
48
49
50
51
52
53
54
55
56
57
58
59
60
61
62
63
64
65
66
67
68
69
70
71
| {
"name": "cq-vui",
"version": "0.1.0",
"license": "ISC",
"main": "lib/cq-ui.umd.min.js",
"description": "一个UI组件库",
"author": {
"name": "长情"
},
"keywords": [
"vue",
"UI"
],
"scripts": {
"serve": "vue-cli-service serve",
"build": "vue-cli-service build",
"lint": "vue-cli-service lint",
"lib": "vue-cli-service build --target lib --dest lib packages/index.js"
},
"dependencies": {
"core-js": "^3.6.5",
"cq-vui": "^0.1.0",
"vue": "^2.6.11",
"vue-router": "^3.2.0",
"vuex": "^3.4.0"
},
"devDependencies": {
"@vue/cli-plugin-babel": "~4.5.0",
"@vue/cli-plugin-eslint": "~4.5.0",
"@vue/cli-plugin-router": "~4.5.0",
"@vue/cli-plugin-vuex": "~4.5.0",
"@vue/cli-service": "~4.5.0",
"@vue/eslint-config-prettier": "^6.0.0",
"babel-eslint": "^10.1.0",
"eslint": "^6.7.2",
"eslint-plugin-prettier": "^3.3.1",
"eslint-plugin-vue": "^6.2.2",
"lint-staged": "^9.5.0",
"prettier": "^2.2.1",
"sass": "^1.26.5",
"sass-loader": "^8.0.2",
"vue-template-compiler": "^2.6.11"
},
"eslintConfig": {
"root": true,
"env": {
"node": true
},
"extends": [
"plugin:vue/essential",
"eslint:recommended",
"@vue/prettier"
],
"parserOptions": {
"parser": "babel-eslint"
},
"rules": {}
},
"browserslist": [
"> 1%",
"last 2 versions",
"not dead"
],
"gitHooks": {},
"lint-staged": {
"*.{js,jsx,vue}": [
"vue-cli-service lint",
"git add"
]
}
}
|
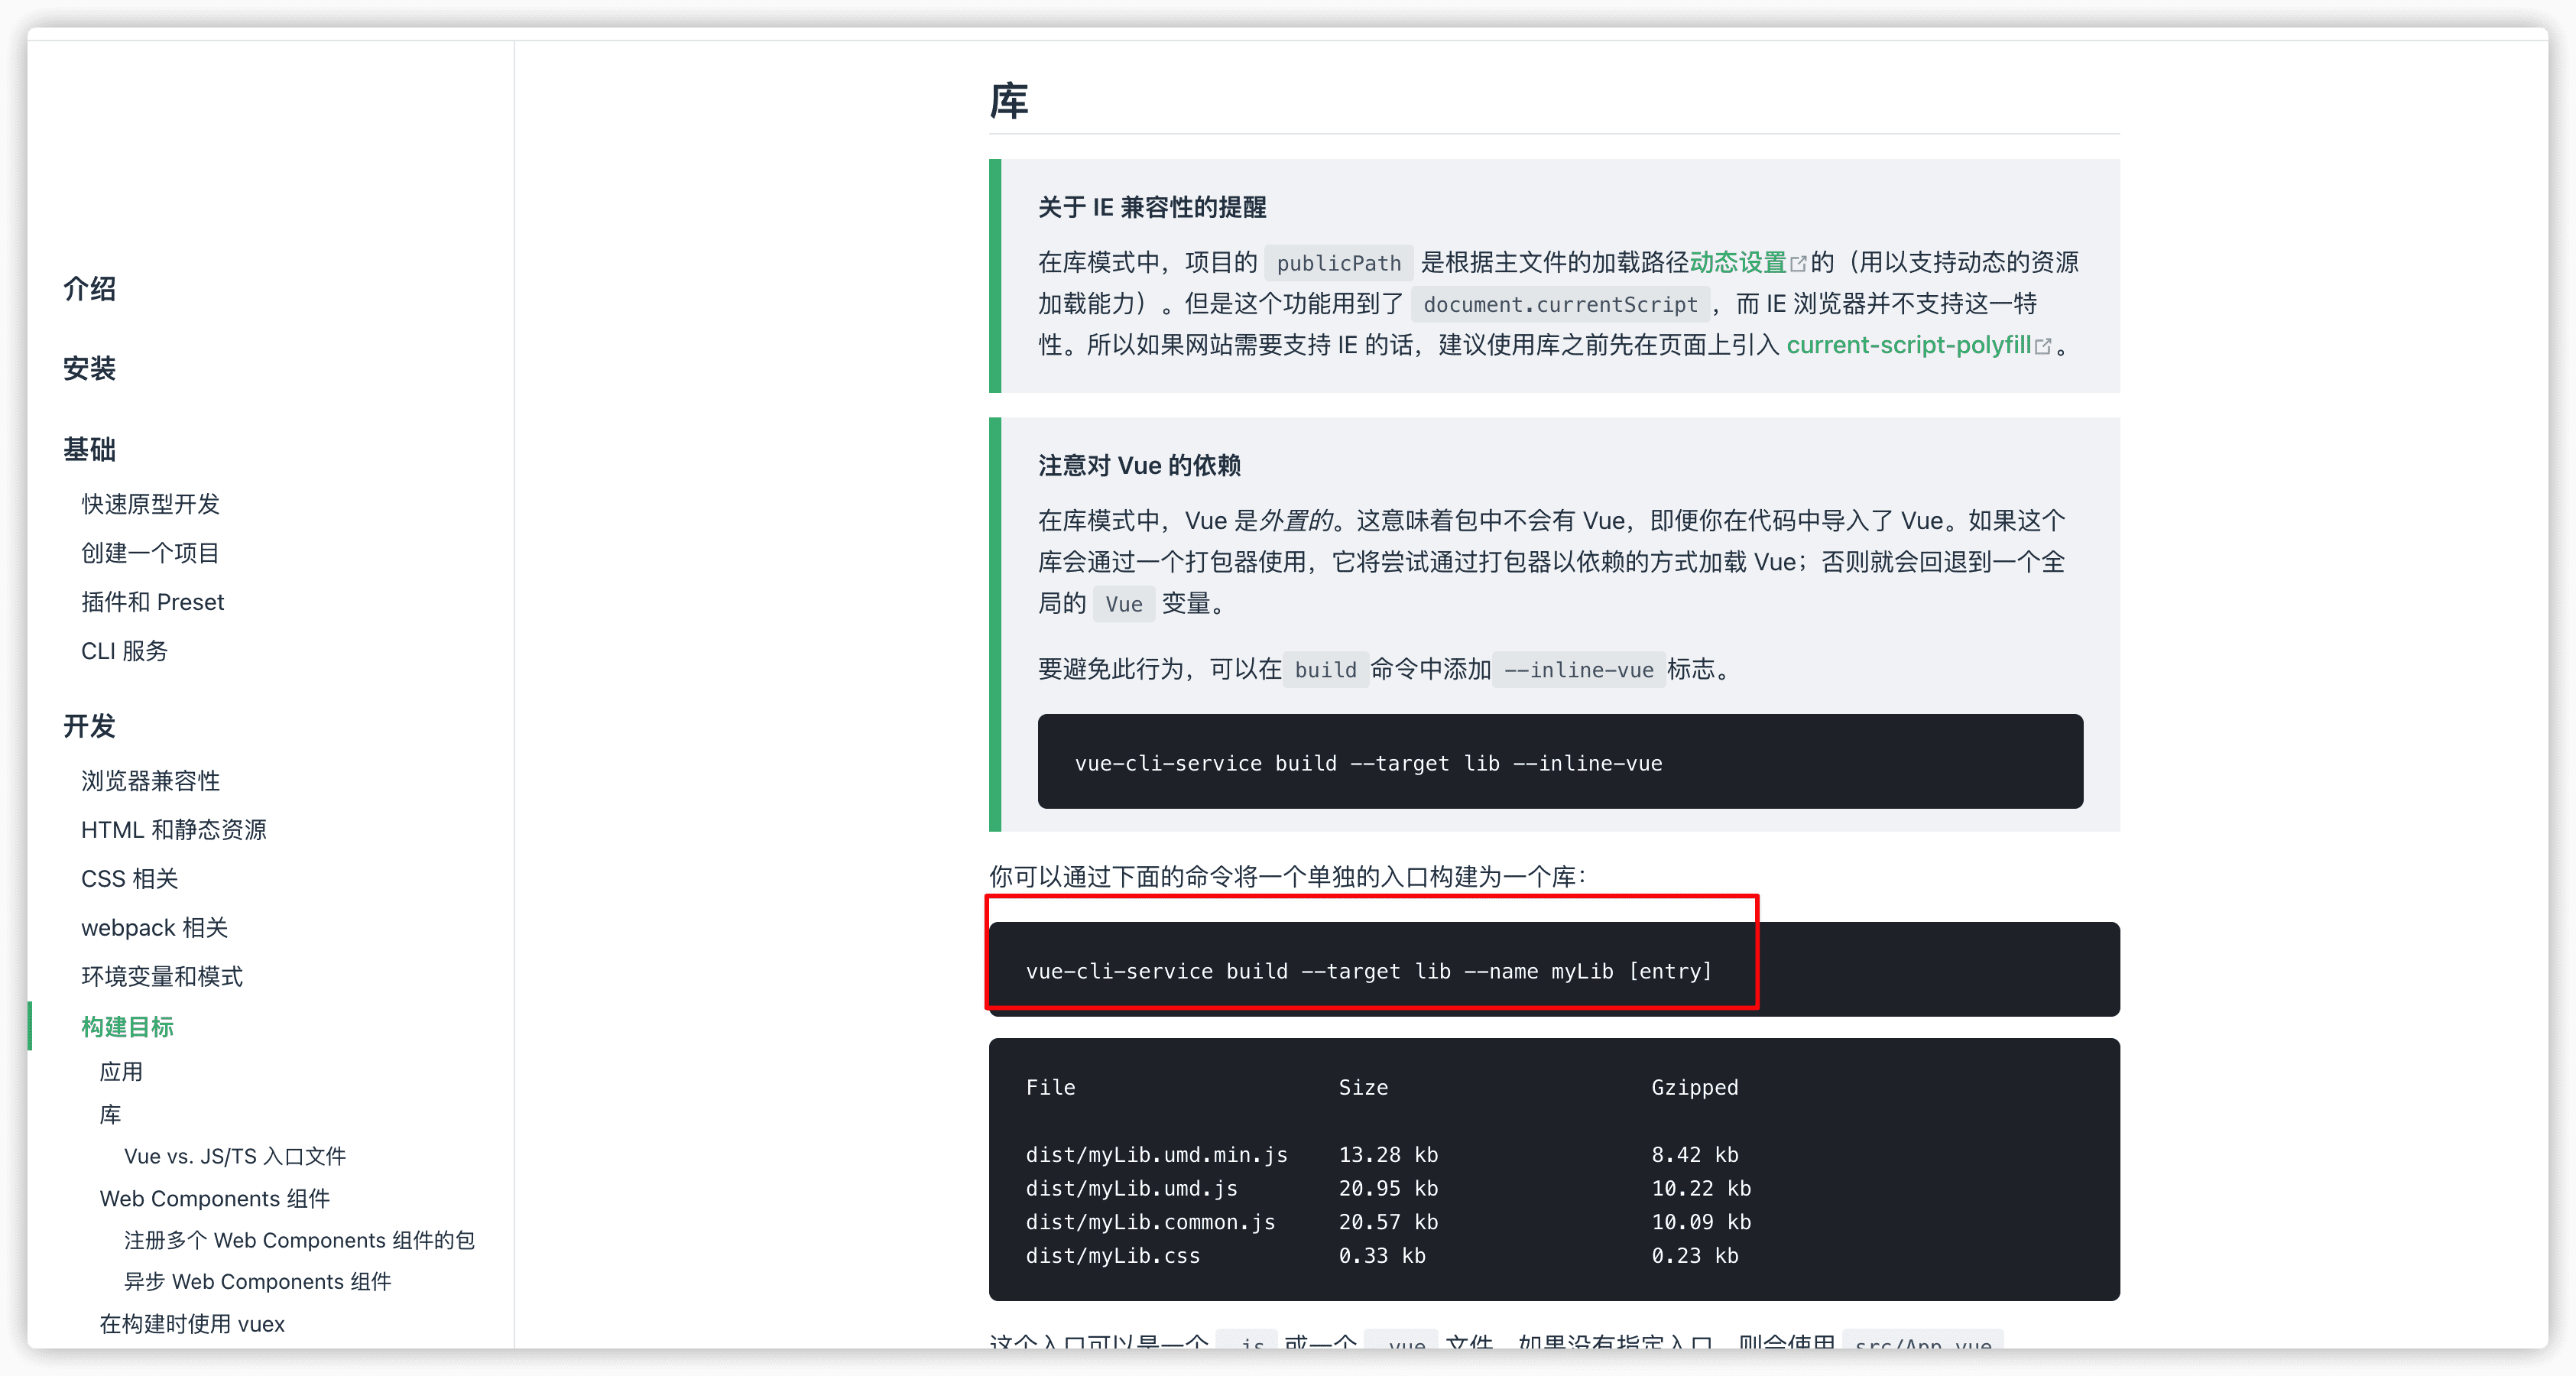
注意这句话**”lib”: “vue-cli-service build –target lib –dest lib packages/index.js”**
是为了构建npm包的,可以看到vue-cli官方文档中有这段介绍
调整**.gitignore**文件
1
2
3
4
5
6
7
8
9
10
11
12
13
14
15
16
17
18
19
20
21
22
23
24
| .DS_Store
node_modules
/dist
.npmignore
# local env files
.env.local
.env.*.local
# Log files
npm-debug.log*
yarn-debug.log*
yarn-error.log*
pnpm-debug.log*
# Editor directories and files
.idea
.vscode
*.suo
*.ntvs*
*.njsproj
*.sln
*.sw?
|
创建vue.config.js
1
2
3
4
5
6
7
8
9
10
11
12
13
14
15
16
17
18
19
20
21
22
23
| const path = require("path");
module.exports = {
pages: {
index: {
entry: "examples/main.js",
template: "public/index.html",
filename: "index.html",
},
},
chainWebpack: (config) => {
config.module
.rule("js")
.include.add(path.resolve(__dirname, "packages"))
.end()
.use("babel")
.loader("babel-loader")
.tap((options) => {
return options;
});
},
};
|
创建**.npmignore文件,上传到npm时要忽略上传的文件,由于后面上传npm**要用到,就在这说了!
1
2
3
4
5
6
7
8
9
10
11
12
13
14
15
| node_modules/
src/
rollup.config.js
app.vue
.gitignore
# 忽略目录
examples/
packages/
public/
# 忽略指定文件
vue.config.js
babel.config.js
*.map
|
上传到github仓库
登录github
点击创建仓库
给仓库起个名字(cq-vui)
在项目中执行
1
2
3
4
| yarn add .
yarn commit -m 'init'
yarn remote xxx(你的仓库地址)
yarn push origin master
|
执行完这些命令之后就已经将本UI库上传到github上了
上传到npm仓库
首先,你要有一个npm账号,没有的话自行注册。
在命令行执行,保证上传是正确的
1
2
3
| yarn add nrm -g
nrm ls
nrm use npm
|
在命令行执行yarn lib进行打包生成要上传到npm上的文件
在命令行执行 ** npm login** 进行登录
在命令行执行npm publish
验证UI组件库是否成功
在项目中执行
在main.js中全局使用
1
2
3
4
5
6
7
8
9
10
11
12
13
14
15
16
17
| import Vue from "vue";
import App from "./App.vue";
import router from "./router";
import store from "./store";
+ import CqVui from 'cq-vui/lib/cq-vui.umd'
+ import 'cq-vui/lib/cq-vui.css'
+ Vue.use(CqVui)
Vue.config.productionTip = false;
new Vue({
router,
store,
render: (h) => h(App),
}).$mount("#app");
|
在页面上使用
1
2
3
4
5
6
7
8
9
10
| <template>
<cq-button>我是按钮</cq-button>
</template>
<script>
export default {};
</script>
<style></style>
|
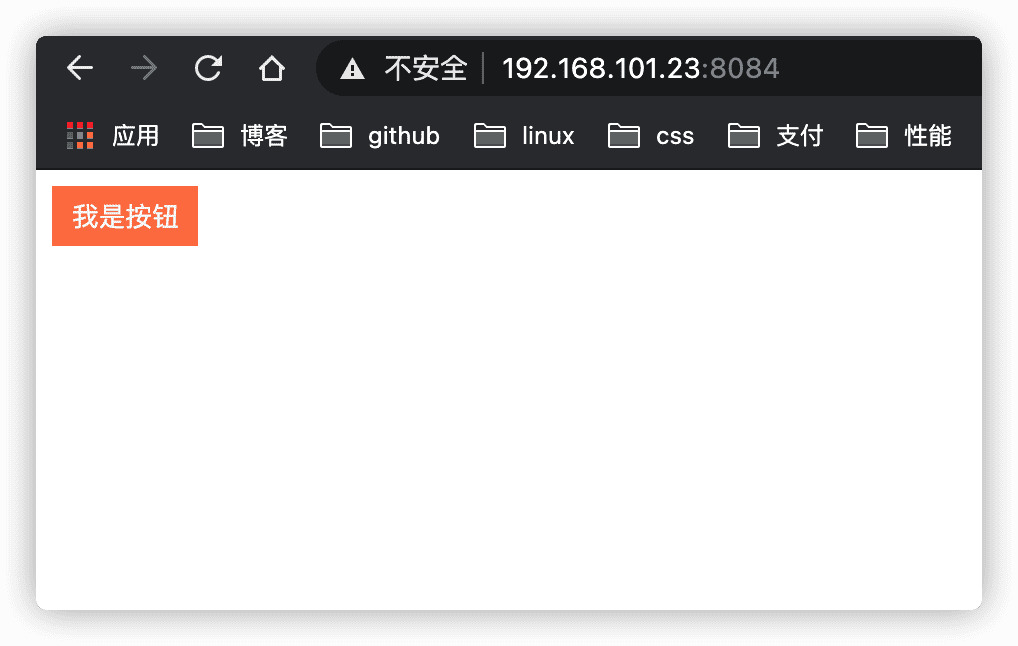
页面上显示的效果
到此UI组件库基础搭建已经全部完成
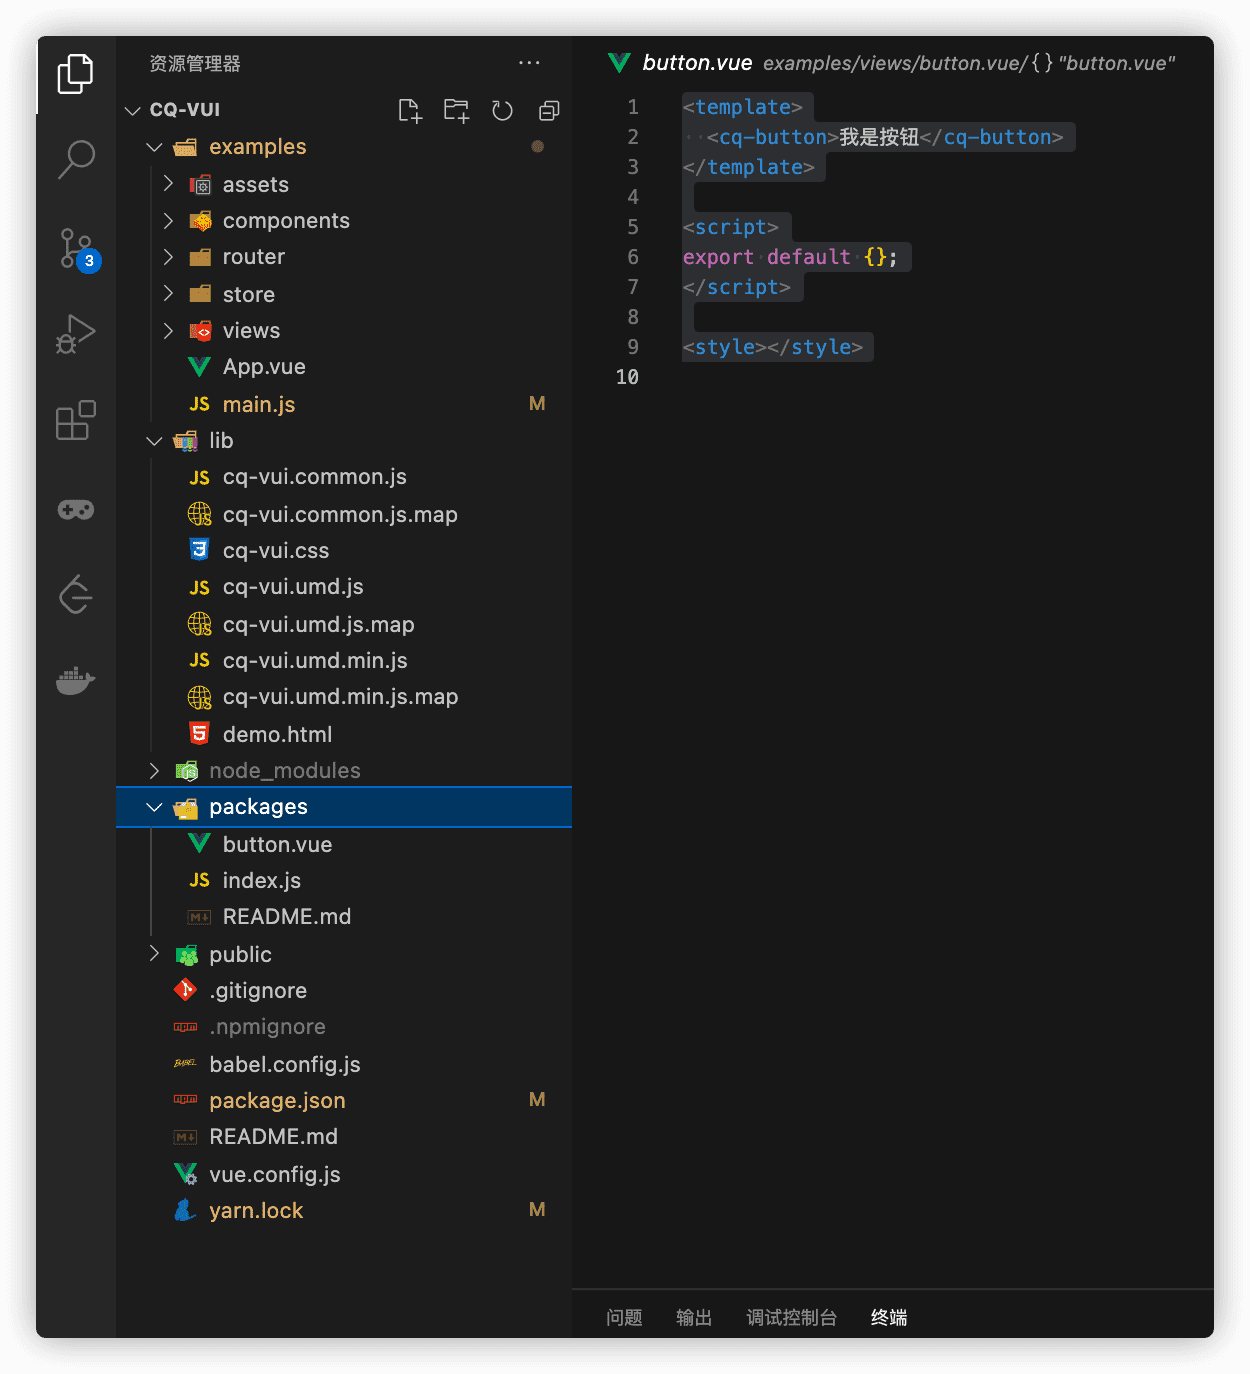
项目结构
组件开发
将会慢慢完善,敬请期待
注意:部分文章可能会在不就的将来更新
如果能够帮助到你,是小编最大的荣幸
当然 有 不好的地方 请大家帮忙指出 学习永无止境
小编一直认为 人外有人 天外有天 一起学习 共同进步
让我们共同加油吧!!!